


Wednesday 26 Aug 2009

Photoshop’s Glass filter is often overlooked, but when it’s used creatively, it’s capable of creating some powerful and impressive visual effects. The Glass filter works by distorting an image using greyscale information, in a similar way to how bump maps in 3D applications work.
In this tutorial, Mark Mayers reveals how to create a realistic shattering glass effect using displacement maps. You’ll learn how to prepare a suitable image for displacement, and discover how Alpha channels work in conjunction with the Glass filter to distort and push out the hidden lighting and edge detail.
Next, you’ll learn how to add specular highlights and use some custom brushes to really pull off the effect. Once you’ve mastered the Glass filter, there’s nothing stopping you from playing with textures such as wood or stone as displacement maps, giving you a wealth of texturing options to add to your creative arsenal.
Some of the files used in this tutorial can be downloaded for a small cost from iStockphoto, while others are available for free from stock.xchng.
 01. Create a new A4 Photoshop document, in portrait orientation in RGB and at 300dpi, with the background set to black. Buy the image from iStockphoto at tinyurl.com/ncjh5d, or use a similar image of your own.
Open the image and drop it into your working file as a new layer, labelling it ‘Face’. Now resize it, position it centrally, and drop it into a group folder labelled ‘FACE’. Next, draw a closed path around the tongue, generate a path-based selection, feather it by two pixels, then use the Burn tool to darken.
02. Duplicate the ‘Face’ layer, setting blending mode to Soft Light and the opacity to 21%. Name the layer ‘Face soft light’, then add a mask to the folder. Use a large, soft-edged brush on the mask to gently blend the hard edges of the face into the background. 0
 03. Open a smoke image (you can download the one used here from tinyurl.com/nmlsvs), and copy-and-paste a rectangular selection above the folder. Resize and position the image at the base of the canvas, then duplicate it, flip it horizontally and move it to the top of the canvas. Merge the two layers, label it ‘Mist’ and drop the opacity to 37%.
 04. Add the ‘Mist’ layer to a new group folder labelled ‘ATMOSPHERE’. With the ‘Mist’ layer targeted and Alt/Opt held down, click on the Create New Fill or Adjustment Layer icon at the bottom of the palette, and select Hue/Saturation from the dropdown menu. Check Use Previous Layer to Create Clipping Mask, click OK and set Saturation to -83 and Lightness to -30.

05. Now we need to blend the mist into the face: add a mask to the folder and use the same technique as step 2 to softly blend the mist into the face. If you refer to the finished image, you’ll see the mist is quite subtle, so feel free to adjust the layer’s opacity to taste.
 06. Add a Color Balance Adjustment Layer at the top of the stack. First, select the Shadows and set the Red to -21 and the Blue to +12. Then select the Midtones and set the Red to -68 and the Blue to +16. Finally, select the Highlights and set the Red to -25, the Green to +17 and the Blue to +19.
 07. The image is starting to take shape, but it’s a little oversaturated for my liking. Fix this by dropping a Black & White adjustment layer at the top of the stack, selecting the High Contrast Blue filter from the Preset menu. You can now knock back the effect by reducing the adjustment layer’s opacity to 23%.

08. Download the free broken glass photo we’ve used from stock.xchng at tinyurl.com/msg779. Open the photo and drag-and-drop it into your document as a new top layer, labelling it ‘Glass’. Rotate it 90° anti-clockwise, then lower its opacity to around 40% – this will help to resize and position it over the face as shown. Next, draw a series of closed paths around any unwanted glass segments, generate path-based selections and fill with black.
 09. Target your ‘Glass’ layer, select all (Ctrl/Cmd+A) and copy (Ctrl/Cmd+C), then switch to your Channels palette and click on the Create New Channel icon. Paste your selection into the new channel and label it ‘Glass sharp’, then use a small, hard-edged, white brush to clean up all the black pit holes and dirt. Use the Burn tool to accentuate the black shatter lines. Finally, add a Levels adjustment, setting the midpoint to 0.55 and white point to 126.
 10. Duplicate the channel by dragging its thumbnail into the Create New Channel icon, give it a Gaussian Blur of two pixels (Filter > Blur > Gaussian Blur) and name it ‘Glass blur’. Now select Duplicate Channel (it’s at the top right fly-out menu in the Channels palette), then in the next window select New under Document Destination. The channel will now open as a new Photoshop file; this file is what we’ll be using as the displacement map in step 12, so save it to a memorable location as Face_glassified.psd.

14. Load DA_Glass_brushes.abr from the cover CD, then add a new layer called ‘Small fragments’ above the ‘Glass’ layer. Set the foreground to white and use the brushes sparingly in a stamping fashion around the main cracks. Next, set the Magic Wand tool to Contiguous and generate partial white selections from the ‘Glass sharp’ channel. Add a new layer, then use a white, soft-edged brush to paint glass highlights – paying close attention to the light source. Finally, set the layer’s blending mode to Overlay, drop its opacity to 66% and label it ‘Glass highlights’.
 15. Add a top layer and use a black, soft-edged brush to add top and bottom shadow areas, then set the layer to Multiply and the opacity to 45%. Now add a Black & White adjustment layer, selecting the Maximum White preset, then drop the adjustment layer’s opacity to 16%.
 16. Drop the ‘Glass’ layer into a masked folder and blend the bottom areas. Add a couple of layers set to Multiply and Colour to stain the teeth yellow and the eyes red. Create further ‘Highlight’ layers, then add them and the ‘Small fragments’ layers into a ‘HIGHLIGHTS’ group folder. To finish off, launch Illustrator and open Graphics.ai from the CD – now copy-and-paste each group as Smart Objects into a ‘GRAPHICS’ folder at the top of the stack.
__________________________________________________________
In this Photoshop tutorial I will be walking you through the making of an interesting art piece, “The Eye, the Key of the Soul.”
In this tutorial we will use the burn tool, dodge tool, brushes, layer modes and more to add an interesting effect to an otherwise regular stock photo.

Using the burn tool now, pass in turn of the pupil of the eye and in turn of the eye. Now get out the Dodge Tool and set the mode to midtones again. Use the dodge tool to lighten up the pupil and also among where you used the burn tool to darken.


I also create another pupil-color layer, brushed inside of it it with a yellow-orange, changed the layer mode to Linear Dodge and lowered the fill to 10%.


____________________________________________________________
In this tutorial, we’ll go through all the steps of creating a flaming skull in Photoshop. We’ll be using some images we shot ourself of flames, and a stock Designious vector skull to get us started. This tutorial covers some relatively simple steps and some clever photo manipulation techniques. Let’s get to it!
To get things started, create a new document 210mm by 290mm with a 100% black background.
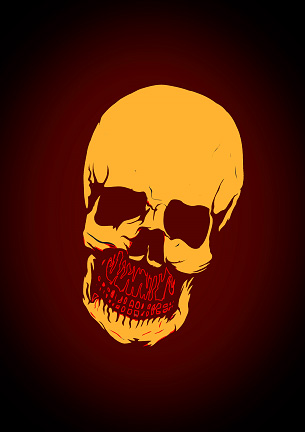
Select the area under the nose including the teeth. Now grab a 80px Brush with a color of red (#d02207). Brush color on the right and left sides creating a soft gradient that ads depth to the lower part of the skull.
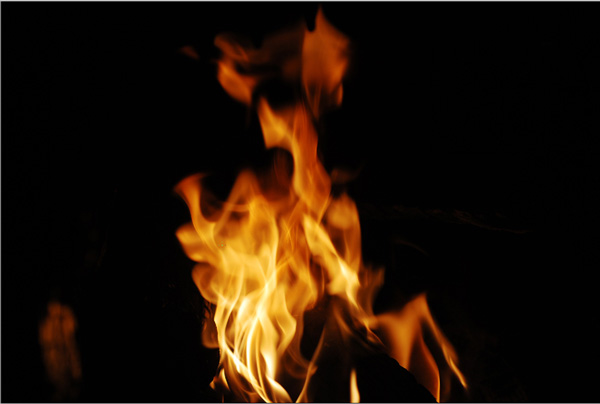
A. Open the flames files.
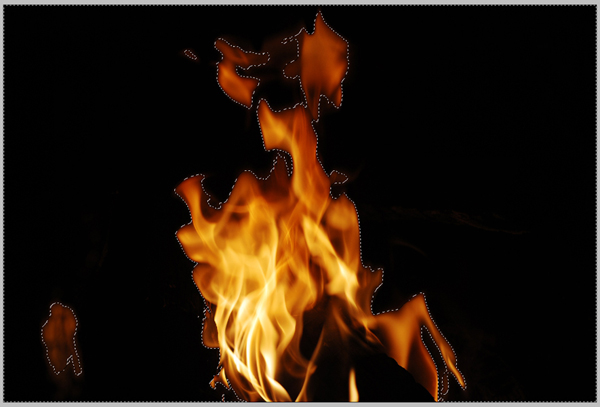
 B. Go to Select > Color Range, and select the darker area of the background. Next, Invert the selection (Command + Shift + I).
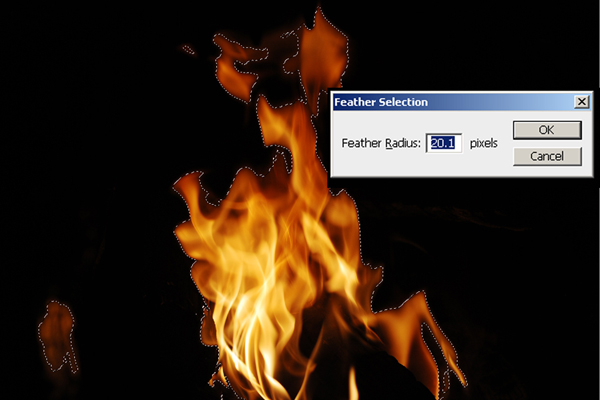
 C. Go to Select > Modify > Feather, and set to about 20px. Then drag and drop them into our main skull document.
 D. Set the blend modes to Screen or Lighten.
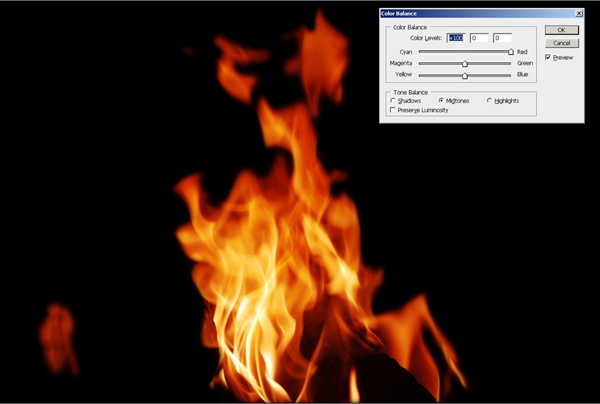
E. For the flames that will have other flames on top of them, we’ll need to adjust the color Balance. You can do this by going to Image > Adjustments > Color Balance (Command + B).


________________________________________________________________
This is a Photoshop tutorial showing you all the steps you need to take in order to photo-manipulate yourself into a Na'vi (based on the characters in James Cameron's movie "Avatar"). I used Photoshop CS2 in order to create this, but newer and older versions should do the same, as I used basic Photoshop tools only. I hope you will find this helpful.
Step 1
Import a photograph of your choice, but make sure its size is relatively large, as it gives more room to play with. Also, make sure that the person on the photograph is well lit - but not overlit - perhaps taken with a flash, so that enough sharp details are visible.
Step 2
Choose a "hard" brush from the"Tools" window (I tend to use a "Chalk" brush) and set its "Mode" to "Color", and its "Opacity" to 50%. Now pick a shade of blue from your Color Palette and brush over the entire skin area, leaving out the hair, eyes, and clothing. Now repeat this a couple of times using different shades of blue. In order to get the kind of blue I wanted, I did this four times in total using these colours: #5d7a99 - #32576a - #3c6986 - #54809b. However, every photograph is different, so you may prefer different shades of blue for your image.
And finally, pick a shade of purple, I used #472a50, with a small brush and its Opacity set to 10%, paint the lips with it, and then randomly brush all over the face with it, as this breaks everything up a bit, thus making it more "natural" looking.
Step 3
Now in my case, I was working on a picture of Tom Cruise with facial stubble. The Na'vi, however, don't seem to have facial hair, apart from the eyebrows - but only if they are a human hybrid (those hybrids also have smaller eyes, and five fingers on each hand instead of four). So I removed the stubble with the "Clone Stamp Tool". You have to zoom right in and press "alt" on your keyboard to select the source area, click once, then let go and paint as normal. Always make sure you pick a source area that looks most similar to the area you want to copy to, and if something doesn't look right, try a different source.

Step 4
Now remove the ears! In my case this was very easy, as I simply had to paint them black / match the background. The person on your picture may have long hair, in which case you could just hide the ears by using the "Clone Stamp Tool" and copy hair over. However if you have short hair this step could be tricky, for the Na'vi (and the hybrids) have their ears set higher up than human ears. In any case, I would probably use the Clone Stamp Tool again.
Now either you can paint the Na'vi ears yourself, do as I did - import a screenshot I found on the Internet. There are many movie screenshots you can find on the Internet. Save the image onto your computer and go to "File" then "Open..." and select the image.
You can also download the ears I've prepared to make your life easier.
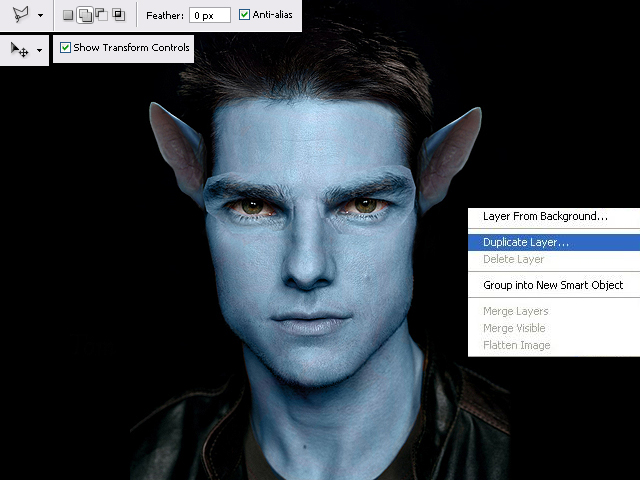
Now select the "Polygonal Lasso Tool" in the Tools window, and create a mask around the ear you wish to import. Once you have done this, either drag the image over into your project, or you can go to "Edit" and "Copy" the ear and "Paste" it onto your image. It will now be on a new layer - which you can see in your "Layers" window. Now place the imported ear wherever you want it to be - you may need to resize it, so click on the "Move Tool", then click on one of the corners of your selection and click on "Maintain aspect ratio" which is the little "chain" icon in the menu (you don't have to do this if you don't wish). Now drag on one of the corners of your selection until the ear has the right size you want.
Step 5
If it's a frontal face shot you're working on, you simply need right-click with your mouse on the layer with the ear, and select "Duplicate Layer". Then right-click on one of the corners around the selection and choose "Flip Horizontally", and move the second ear to where you want it to be. As you can see, the image of the ear that I had originally imported had the tip of the ear missing. I fixed this by painting the rest in, using the Clone Stamp Tool, and the Brush Tool set to "Normal" (use the "Eyedropper Tool" to select colours from the actual ear itself).
Step 6
Now we're going to enlarge the eyes. Normally you can try and do this by eye, but because Mr Cruise is looking directly at the camera in my picture, both eyes had to be enlarged identically. First of all, duplicate the overall main image you have so far, so that you have two identical copies lying on top of each other as layers. Then use the "Polygonal Lasso Tool", with "Add to selection" selected from the menu (that way you can select several areas at the same time). Create two masks, one around each eye, including eyelids and eyebrows. Click on "Move Tool" from the Tool bar, then enlarge the selection until the eyes have the size you want. Now click on "Move Tool" again and select "Apply" on the pop-up window. Now "Copy" and Paste" from the Edit Menu. The eyes should now be on a new layer. Duplicate that layer. Then use the Eraser Tool to erase the left eye on one "eye layer", and the right eye on the other eye layer. Basically this means that you now have one layer for each eye, though both enlarged, their proportions to each other are still correct. Press "ctrl" on your keyboard and select both "eye layers" and use the arrow keys on your keyboard to move the eyes up and down, then select each individual eye to move it left and right, once again by using the arrow keys.
Step 7
You can now use the "Eraser Tool" and brush around the eyes with it to remove what is overlapping and the border lines. Doing this will reveal the layer underneath, so don't erase too much.
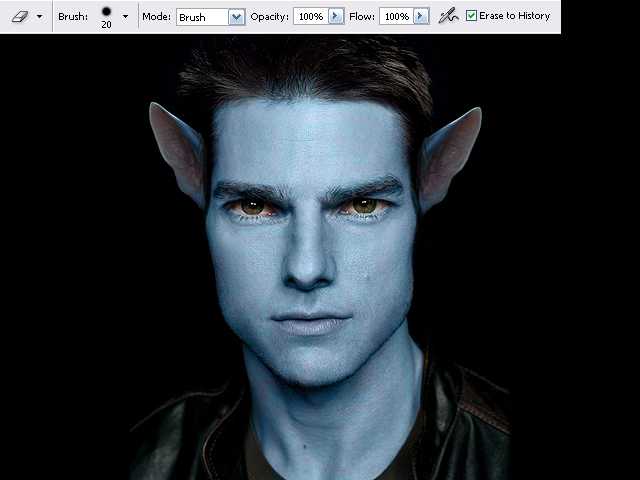
Step 8
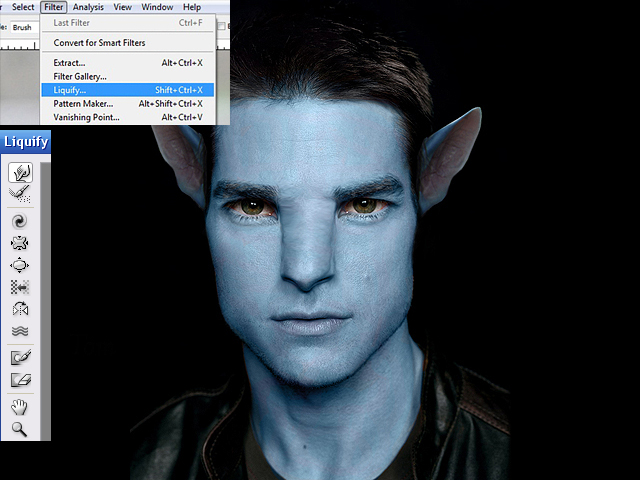
This is the most difficult part - the nose! This could potentially take quite some time, so don't get frustrated, just try your best.
Use the "Rectangular Marquee Tool" and generously select the nose along with its surrounding area. Select "Filter" from the main menu and go to "Liquify...". A new window opens and you may want to zoom in a little. Select the "Forward Warp Tool" - with the "Brush Density" and "Brush Pressure" set to 100. And now "shape" the nose into that of a Na'vi's. If you make a mistake you can use the "Reconstruct Tool". It will probably look a little strange, but that's ok, just click "OK" when it looks remotely like the one in my picture. If yours looks better, excellent!
Step 9
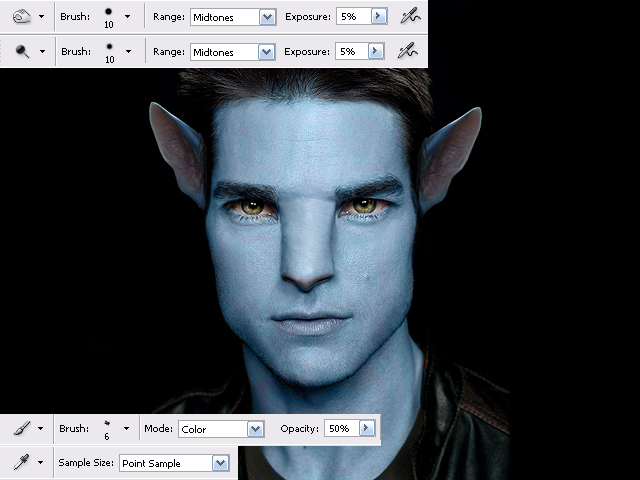
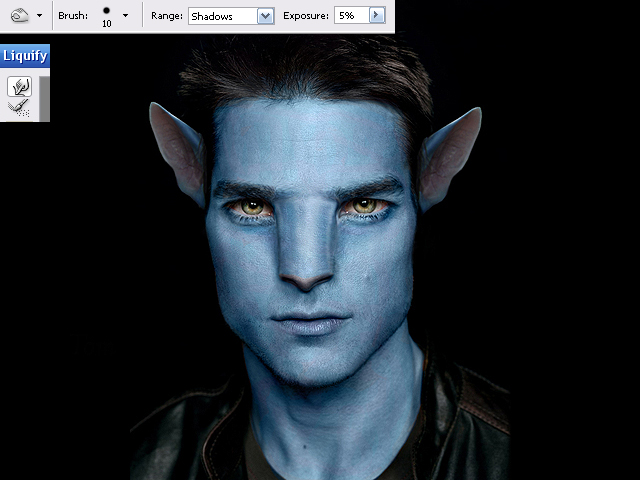
This is still fairly difficult. You will now be using the "Burn" and "Dodge" tools from the Tools window a lot. Use both tools, with their "Range" set to "Midtones", and the "Exposure" set to 5% and continue to "shape" the nose by carefully adding definition. "Burn" darkens, while "Dodge" highlights, so make sure you figure out where the light on your picture is coming from. Because this step is so tricky, it is okay to carry on with the next steps and return to the nose from time to time.
I also used the "Dodge" tool, set to "Midtones" and "Highlights" in order to brighten the irises of the eyes. And finally I dyed the tip of my nose pink, with the Brush tool set to "Color", and the colour itself taken from the ears by using the "Eyedropper Tool".
Step 10
I continued to use the "Burn" tool - a combination of both "Midtones" and "Shadows", to further add definition all around the face. Check out the differences between images 9 and 10. You may choose not to do this on your photograph. However, you might have noticed that I went back to "Liquify" the nose a little more....
Step 11
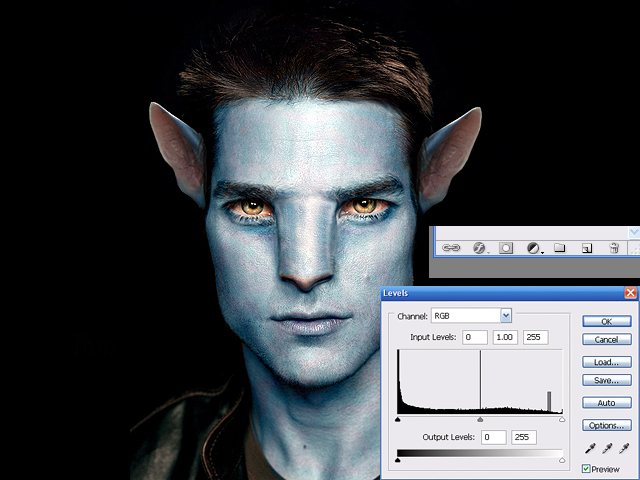
My overall image had turned a little too dark in my opinion, so I went to my Layers window, and at the bottom I clicked on the "black and white" symbol that has the name "Create new fill or adjustment layer", and selected "Levels..." from the menu. Now a new window opens up and and all I did was click on "Auto" and "OK". However that option doesn't always turn out a good image, so you may want to play around with the sliders. Alternatively, if your image is too light or pale, you can change this here too, using the sliders.
Step 12
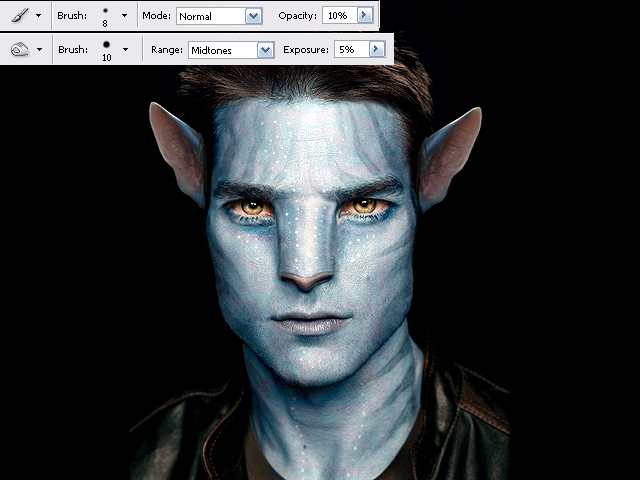
For the pattern and sparkles on the face, use the "Burn" tool - Midtones and Shadows, as well as the "Brush tool" - this time a circle shape - with its Hardness 50%, Opacity around 10%, so there's room to build up colour depth, the "Mode" set to "Normal". You'll need to play around with this, as it can take a while to get it right.
Step 13
Now it's time to enlarge the irises of the eyes! Basically we're repeating Step 6 here. So follow every single step, just apply them to the irises alone. Once you're happy with their position, use the "Eraser Tool" to bring back the eyelids from the layer underneath.
And finally I did some additional lighting effects, by using the "Burn Tool" set to "Shadows" and the "Dodge Tool" set to "Highlights". Check out the differences between Image 12 and 13. However this may not be relevant to your image. All done, I hope you are pleased with your results.
Step 14
Now let's compare the final result with the original image:
Good luck!
Master a convincing shattering-glass effect that has dozens of applications with this brilliant technique from Mark Mayers.
In this tutorial, Mark Mayers reveals how to create a realistic shattering glass effect using displacement maps. You’ll learn how to prepare a suitable image for displacement, and discover how Alpha channels work in conjunction with the Glass filter to distort and push out the hidden lighting and edge detail.
Next, you’ll learn how to add specular highlights and use some custom brushes to really pull off the effect. Once you’ve mastered the Glass filter, there’s nothing stopping you from playing with textures such as wood or stone as displacement maps, giving you a wealth of texturing options to add to your creative arsenal.
Some of the files used in this tutorial can be downloaded for a small cost from iStockphoto, while others are available for free from stock.xchng.
Open the image and drop it into your working file as a new layer, labelling it ‘Face’. Now resize it, position it centrally, and drop it into a group folder labelled ‘FACE’. Next, draw a closed path around the tongue, generate a path-based selection, feather it by two pixels, then use the Burn tool to darken.
02. Duplicate the ‘Face’ layer, setting blending mode to Soft Light and the opacity to 21%. Name the layer ‘Face soft light’, then add a mask to the folder. Use a large, soft-edged brush on the mask to gently blend the hard edges of the face into the background. 0
__________________________________________________________
In this Photoshop tutorial I will be walking you through the making of an interesting art piece, “The Eye, the Key of the Soul.”
In this tutorial we will use the burn tool, dodge tool, brushes, layer modes and more to add an interesting effect to an otherwise regular stock photo.

Preface
Before we get started I would like you to know that this tutorial was written by Krinos, and the stock photo used is by xerolime, you can download it from here.1.
Open up the stock photo you’ve chosen to be working with for this tutorial. Duplicate it once (just in case!) Find and get out the Burn Tool, change the range/mode for it to ‘midtones’ and set the opacity to something light-medium.Using the burn tool now, pass in turn of the pupil of the eye and in turn of the eye. Now get out the Dodge Tool and set the mode to midtones again. Use the dodge tool to lighten up the pupil and also among where you used the burn tool to darken.
2.
Again using the dodge tool, make some ‘rays’ just outside of the iris, and lighten up any other areas you think may need it.3.
Now use Lighting Effects (filter > render > lighting effects) to add an interesting lighting effect to the overall photo, you may want to mess around with the colors for the lighting effects filter. Try not to over-saturate the photo though on this step, if your lighting effects affect it too much, go to edit > fade lighting effects and put it at around 50%.4.
Now it’s time to recolor the center of the eye. Do this by making a new layer (layer > new > layer) and brush a little bit inside of the eye with a soft brush, using the color of your choice (orange). After you’ve made your little bit of brushing inside of the eye, change the layer mode to Color and lower the opacity to around 50-60%.5.
Using the dodge and burn tools again, add more light/darkness to the pupil to give it a stronger effect.6.
To add more feeling to the photo, go to layer > new adjustment layer > gradient map and made a black & white gradient map. Change the layer mode for this layer to Luminosity and leave the opacity in tact. Repeat step 4 with the eye color part, you may want to use a lower opacity though, and a different color for the brush.7.
A little more dodge & burn tool here, remember to mess with the ‘range’ and opacities for the brushes as well, get creative.I also create another pupil-color layer, brushed inside of it it with a yellow-orange, changed the layer mode to Linear Dodge and lowered the fill to 10%.
8.
To finish off, apply a Selective Color adjustment layer (layer > new adjustment layer > selection color) and use the settings that you find look best. Again, in finishing, apply lighting effects again, but this time lower the opacity afterwards to around 35%. ____________________________________________________________

Download Source Files
- Source files for this tutorial are available to Premium members.
Get a Premium Membership
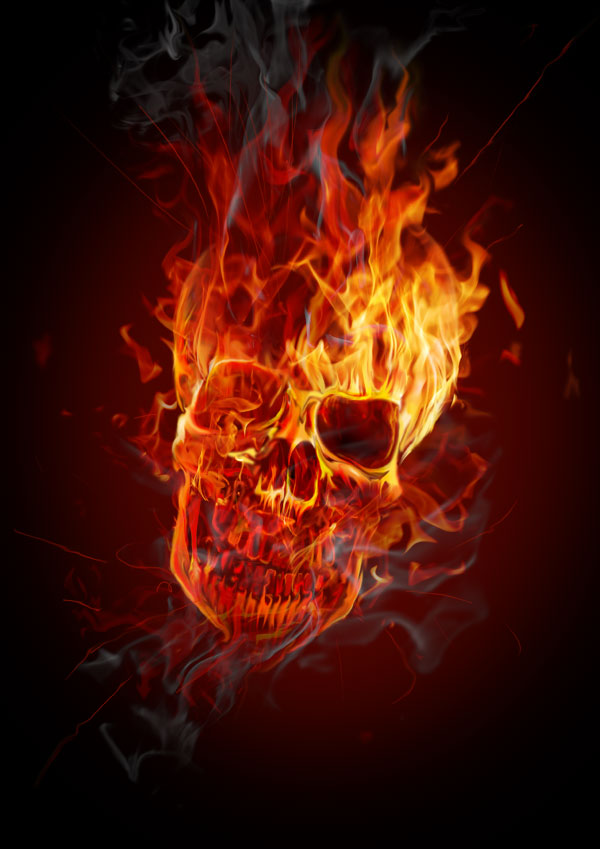
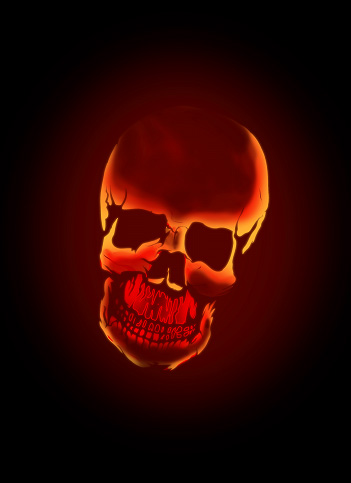
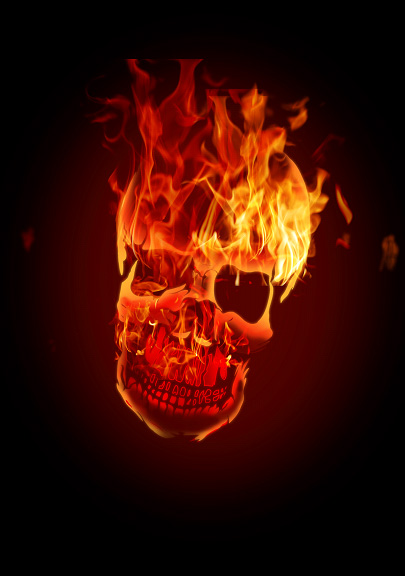
Final Image Preview
Take a look at the image we’ll be creating. Want access to the full PSD files and downloadable copies of every tutorial, including this one? Join Psd Plus for just $9/month. You can view the final image preview below.Step 1
For this tutorial, I used Photoshop CS3, a skull from Designious.com (you could choose to use a free skull though, such as Skull Vector Pack 1) and some hi-res flames images. The high-res image files are available to Psd Plus members in the download pack. Though non-members are certainly welcome to shoot your own flame photos or find some stock to use here, so you can follow along.To get things started, create a new document 210mm by 290mm with a 100% black background.
Step 2
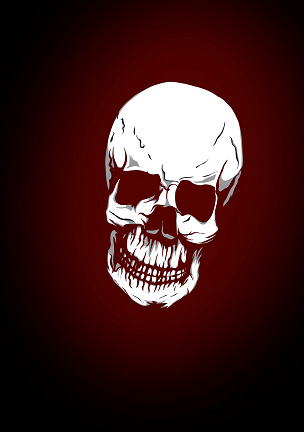
Copy (Command + C) and paste (Command + V) the vector from Illustrator to Photoshop as pixels.Step 3
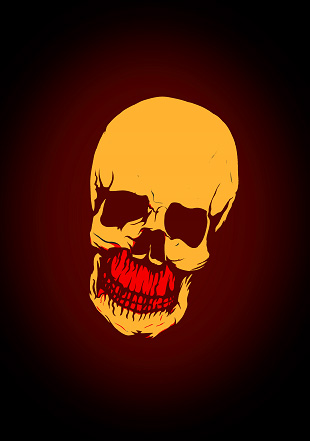
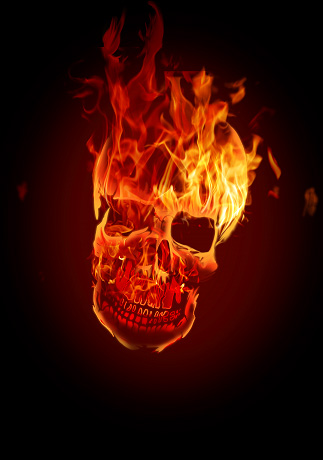
On a new layer create an ellipse filled with dark red (#4c0400) that surrounds the skull. Next, apply a Gaussian Blur of 250px (maximum value), and place that layer under the skull.Step 4
Let’s prepare the skull for the flames. Select the white color from the skull. (Select > Color Range) and fill it with an orange-yellow color(#f9ae31), except the teeth and mandible that will be filled with light red (#e82b19).Step 5
Select the red area using Select > Color Range and then contract using Select > Contract > with 4 px, then and Delete.Step 6
Select the yellow color. Next use a Brush with Toll on 250-300 px, Hardness of 0, Opacity at 10-15%, red for the color (d02207), and gradually color from the interior towards the exterior, until you get a skull with a bit of glow.Step 7
Lets try to add some volume to the skull. Use the Eraser Tool with a diameter of 200px, Hardness of 0, and Opacity of 70%, and erase some of the red. Here we establish the lighter and darker parts of the skull so we can see some volume.Step 8
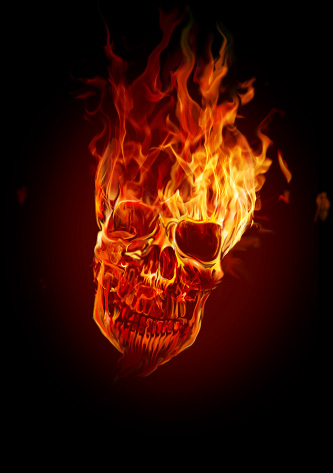
Now double the Skull layer. Select the skull closest to the background and apply a Gaussian Blur of 8-10 px to create a glow.Select the area under the nose including the teeth. Now grab a 80px Brush with a color of red (#d02207). Brush color on the right and left sides creating a soft gradient that ads depth to the lower part of the skull.
Step 9
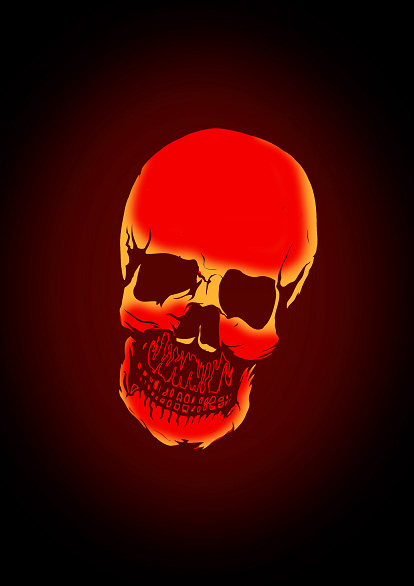
Now that we have a hot skull on our screen, let’s start the fire! Open the files with the flames and prepare each of them to be used on our image as follows:A. Open the flames files.
E. For the flames that will have other flames on top of them, we’ll need to adjust the color Balance. You can do this by going to Image > Adjustments > Color Balance (Command + B).
Step 10
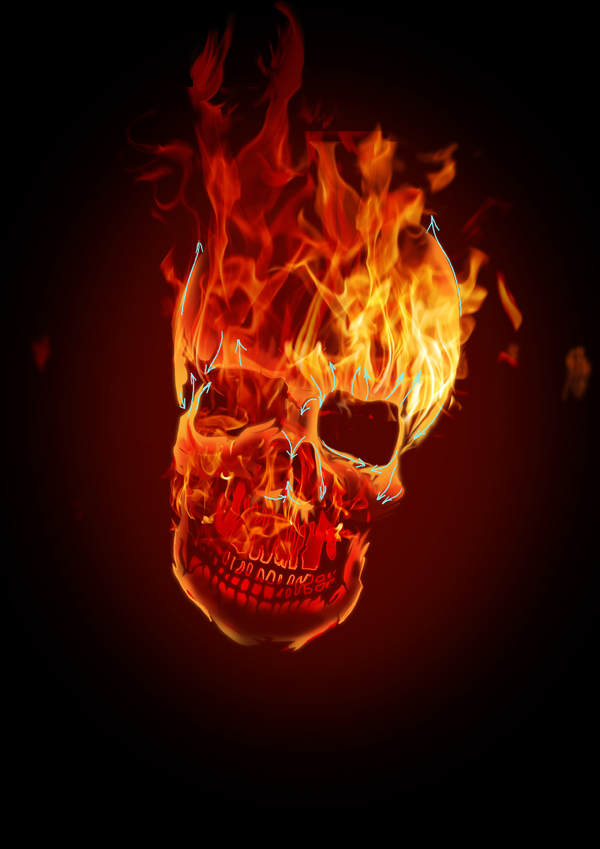
Use the Free Transform Tool (Command + T) to arrange each flame into the desired position and the desired proportions.Step 11
Notice that the teeth area looks a bit darker than the rest of the skull so using the Brush Tool(B) and yellow (d02207) you lighten some parts of the teeth so they can blend better with the flames.Step 12
Use the Smudge Tool (R) on the flames near the eyeballs to make them touch the skull so that you create a smooth transition from the skull to the flames.Step 13
Use the Smudge Tool (R) to make the yellow parts of the skull blend with the base of the flames.Step 14
Use the Smudge Tool again in the red areas from the shadow where you try to draw a contour going towards the dark areas.Step 15
Use the Dodge Tool (O) to enhance the glowing effect on the edges of the skull.Step 16
Use the Burn Tool to work on the shadow areas of the contour so you can smoothen the passes from light to dark.Step 17
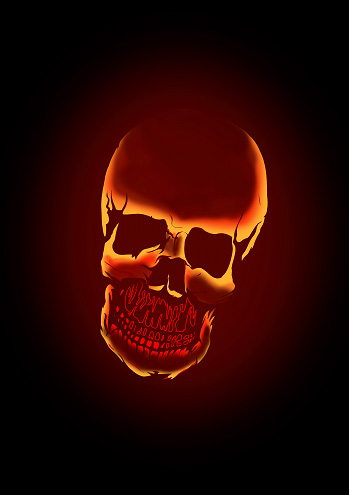
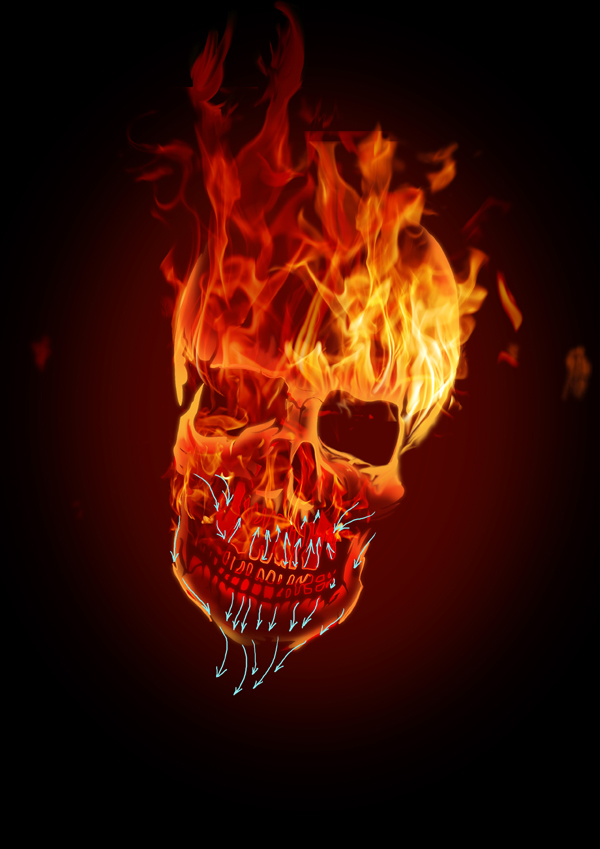
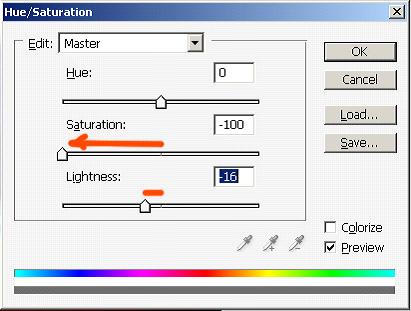
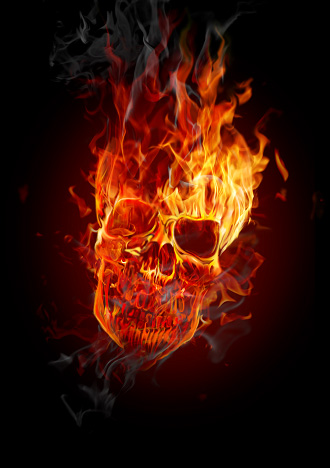
Now for the smoke. To create the smoke, use the same flame images and apply the same techniques you did in Steps 10 and 11 to them. The difference here though is that you’ll need to desaturate these images to make them look like smoke. You can do this by going to Image > Adjustments > Hue/Saturation > Desaturate (Command + U), then set it to -100 for Saturation, and -16 for Luminosity.Step 18
Now lets apply a 2px Blur filter on the smoke so it blends better. Do this by going to Filter > Blur > Gaussian Blur.Conclusion
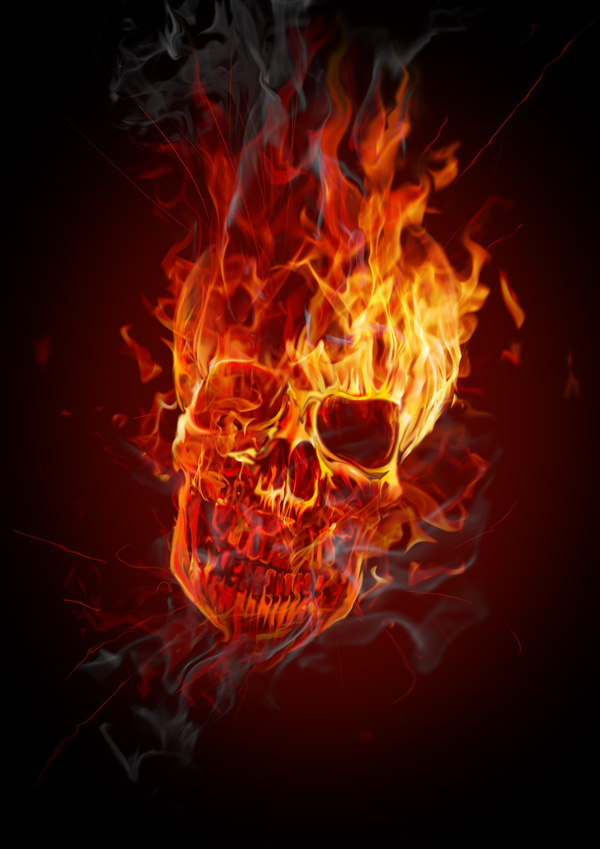
Now the sparks! Using a Brush of 3px with 100% Hardness and 100% Opacity you start drawing the sparks. You can alter some of them using the Smudge Tool (R). And that puts the finishing touches on this image.________________________________________________________________
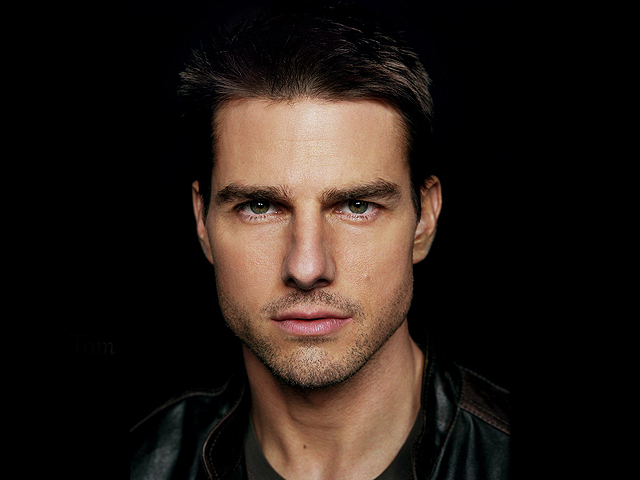
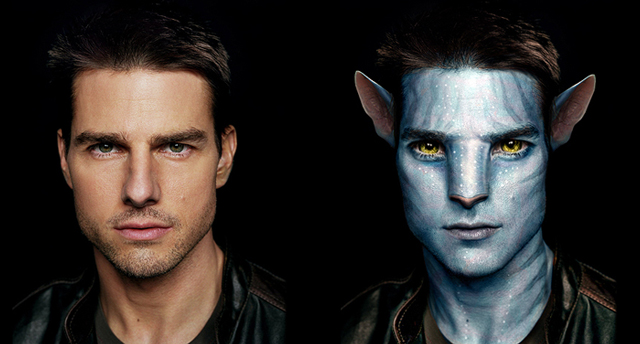
This is a Photoshop tutorial showing you all the steps you need to take in order to photo-manipulate yourself into a Na'vi (based on the characters in James Cameron's movie "Avatar"). I used Photoshop CS2 in order to create this, but newer and older versions should do the same, as I used basic Photoshop tools only. I hope you will find this helpful.
Step 1
Import a photograph of your choice, but make sure its size is relatively large, as it gives more room to play with. Also, make sure that the person on the photograph is well lit - but not overlit - perhaps taken with a flash, so that enough sharp details are visible.
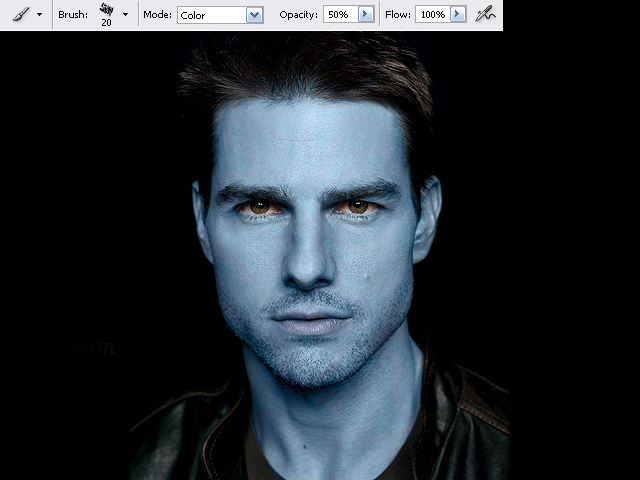
Step 2
Choose a "hard" brush from the"Tools" window (I tend to use a "Chalk" brush) and set its "Mode" to "Color", and its "Opacity" to 50%. Now pick a shade of blue from your Color Palette and brush over the entire skin area, leaving out the hair, eyes, and clothing. Now repeat this a couple of times using different shades of blue. In order to get the kind of blue I wanted, I did this four times in total using these colours: #5d7a99 - #32576a - #3c6986 - #54809b. However, every photograph is different, so you may prefer different shades of blue for your image.
And finally, pick a shade of purple, I used #472a50, with a small brush and its Opacity set to 10%, paint the lips with it, and then randomly brush all over the face with it, as this breaks everything up a bit, thus making it more "natural" looking.
Step 3
Now in my case, I was working on a picture of Tom Cruise with facial stubble. The Na'vi, however, don't seem to have facial hair, apart from the eyebrows - but only if they are a human hybrid (those hybrids also have smaller eyes, and five fingers on each hand instead of four). So I removed the stubble with the "Clone Stamp Tool". You have to zoom right in and press "alt" on your keyboard to select the source area, click once, then let go and paint as normal. Always make sure you pick a source area that looks most similar to the area you want to copy to, and if something doesn't look right, try a different source.
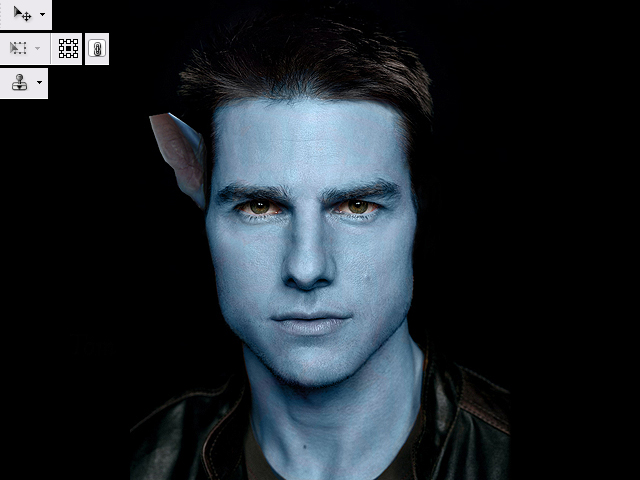
Step 4
Now remove the ears! In my case this was very easy, as I simply had to paint them black / match the background. The person on your picture may have long hair, in which case you could just hide the ears by using the "Clone Stamp Tool" and copy hair over. However if you have short hair this step could be tricky, for the Na'vi (and the hybrids) have their ears set higher up than human ears. In any case, I would probably use the Clone Stamp Tool again.
Now either you can paint the Na'vi ears yourself, do as I did - import a screenshot I found on the Internet. There are many movie screenshots you can find on the Internet. Save the image onto your computer and go to "File" then "Open..." and select the image.
You can also download the ears I've prepared to make your life easier.
Now select the "Polygonal Lasso Tool" in the Tools window, and create a mask around the ear you wish to import. Once you have done this, either drag the image over into your project, or you can go to "Edit" and "Copy" the ear and "Paste" it onto your image. It will now be on a new layer - which you can see in your "Layers" window. Now place the imported ear wherever you want it to be - you may need to resize it, so click on the "Move Tool", then click on one of the corners of your selection and click on "Maintain aspect ratio" which is the little "chain" icon in the menu (you don't have to do this if you don't wish). Now drag on one of the corners of your selection until the ear has the right size you want.
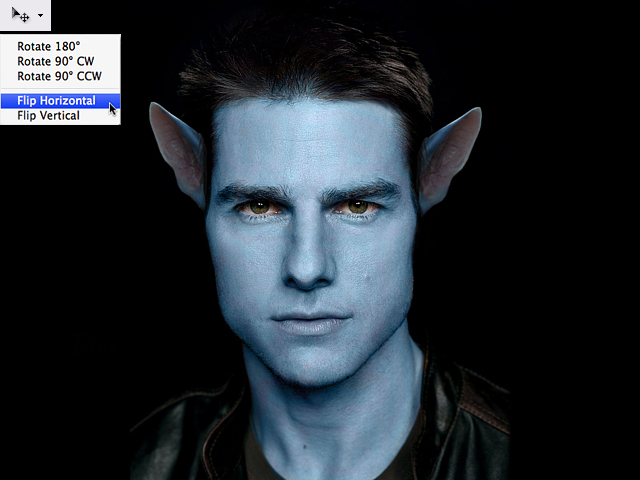
Step 5
If it's a frontal face shot you're working on, you simply need right-click with your mouse on the layer with the ear, and select "Duplicate Layer". Then right-click on one of the corners around the selection and choose "Flip Horizontally", and move the second ear to where you want it to be. As you can see, the image of the ear that I had originally imported had the tip of the ear missing. I fixed this by painting the rest in, using the Clone Stamp Tool, and the Brush Tool set to "Normal" (use the "Eyedropper Tool" to select colours from the actual ear itself).
Step 6
Now we're going to enlarge the eyes. Normally you can try and do this by eye, but because Mr Cruise is looking directly at the camera in my picture, both eyes had to be enlarged identically. First of all, duplicate the overall main image you have so far, so that you have two identical copies lying on top of each other as layers. Then use the "Polygonal Lasso Tool", with "Add to selection" selected from the menu (that way you can select several areas at the same time). Create two masks, one around each eye, including eyelids and eyebrows. Click on "Move Tool" from the Tool bar, then enlarge the selection until the eyes have the size you want. Now click on "Move Tool" again and select "Apply" on the pop-up window. Now "Copy" and Paste" from the Edit Menu. The eyes should now be on a new layer. Duplicate that layer. Then use the Eraser Tool to erase the left eye on one "eye layer", and the right eye on the other eye layer. Basically this means that you now have one layer for each eye, though both enlarged, their proportions to each other are still correct. Press "ctrl" on your keyboard and select both "eye layers" and use the arrow keys on your keyboard to move the eyes up and down, then select each individual eye to move it left and right, once again by using the arrow keys.
Step 7
You can now use the "Eraser Tool" and brush around the eyes with it to remove what is overlapping and the border lines. Doing this will reveal the layer underneath, so don't erase too much.
Step 8
This is the most difficult part - the nose! This could potentially take quite some time, so don't get frustrated, just try your best.
Use the "Rectangular Marquee Tool" and generously select the nose along with its surrounding area. Select "Filter" from the main menu and go to "Liquify...". A new window opens and you may want to zoom in a little. Select the "Forward Warp Tool" - with the "Brush Density" and "Brush Pressure" set to 100. And now "shape" the nose into that of a Na'vi's. If you make a mistake you can use the "Reconstruct Tool". It will probably look a little strange, but that's ok, just click "OK" when it looks remotely like the one in my picture. If yours looks better, excellent!
Step 9
This is still fairly difficult. You will now be using the "Burn" and "Dodge" tools from the Tools window a lot. Use both tools, with their "Range" set to "Midtones", and the "Exposure" set to 5% and continue to "shape" the nose by carefully adding definition. "Burn" darkens, while "Dodge" highlights, so make sure you figure out where the light on your picture is coming from. Because this step is so tricky, it is okay to carry on with the next steps and return to the nose from time to time.
I also used the "Dodge" tool, set to "Midtones" and "Highlights" in order to brighten the irises of the eyes. And finally I dyed the tip of my nose pink, with the Brush tool set to "Color", and the colour itself taken from the ears by using the "Eyedropper Tool".
Step 10
I continued to use the "Burn" tool - a combination of both "Midtones" and "Shadows", to further add definition all around the face. Check out the differences between images 9 and 10. You may choose not to do this on your photograph. However, you might have noticed that I went back to "Liquify" the nose a little more....
Step 11
My overall image had turned a little too dark in my opinion, so I went to my Layers window, and at the bottom I clicked on the "black and white" symbol that has the name "Create new fill or adjustment layer", and selected "Levels..." from the menu. Now a new window opens up and and all I did was click on "Auto" and "OK". However that option doesn't always turn out a good image, so you may want to play around with the sliders. Alternatively, if your image is too light or pale, you can change this here too, using the sliders.
Step 12
For the pattern and sparkles on the face, use the "Burn" tool - Midtones and Shadows, as well as the "Brush tool" - this time a circle shape - with its Hardness 50%, Opacity around 10%, so there's room to build up colour depth, the "Mode" set to "Normal". You'll need to play around with this, as it can take a while to get it right.
Step 13
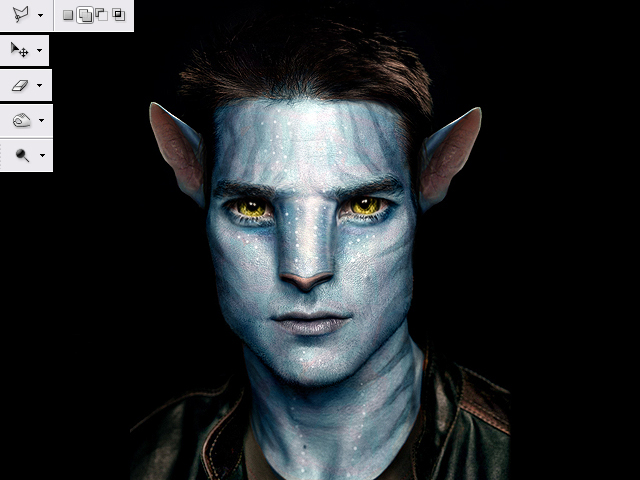
Now it's time to enlarge the irises of the eyes! Basically we're repeating Step 6 here. So follow every single step, just apply them to the irises alone. Once you're happy with their position, use the "Eraser Tool" to bring back the eyelids from the layer underneath.
And finally I did some additional lighting effects, by using the "Burn Tool" set to "Shadows" and the "Dodge Tool" set to "Highlights". Check out the differences between Image 12 and 13. However this may not be relevant to your image. All done, I hope you are pleased with your results.
Step 14
Now let's compare the final result with the original image:
Good luck!


