.

Search This Blog

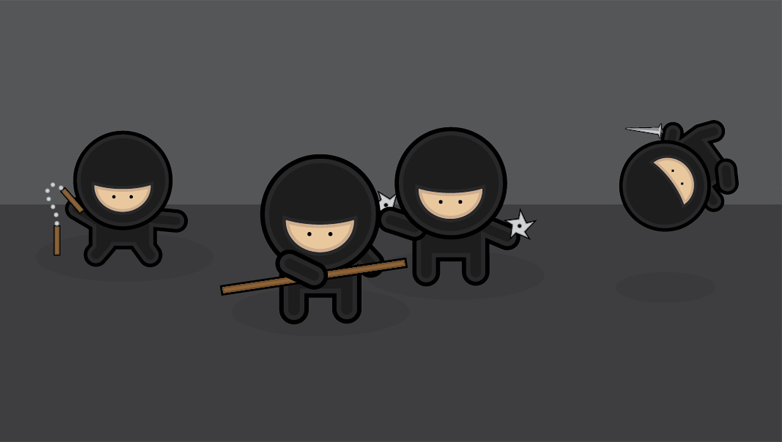
Illustrator Tutorial – Create a Gang of Vector Ninjas

Read the article
Free 
Website Builder
It can be quite tricky getting the hang of Adobe Illustrator, but if you take a step back and concentrate on the basics there's a range of options for creating great looking images. In this tutorial, we'll take a look at constructing a group of cool vector ninja characters using just the basic shapes and a variety of simple tools, making it a good start for Illustrator beginners.

Vector Ninja Characters
After opening up Adobe Illustrator, create a new document. For a fun project the size of the document doesn't matter, Illustrator has a vast area of artboard beyond the document edges that can be used. I personally use the CMYK color mode out of habit and the ease of managing blacks, but a wider range of colours are available with RGB. The choice should really depend on the final outcome of the project; print or web.
Depending whether your Illustrator software has the default settings, you might want to check the options for the scaling of strokes and effects, this little option could save you a headache layer down the line.

Grab the Circle Tool and draw a shape on the artboard, hold the SHIFT key to create a perfectly equal object. By default this will have a white fill and black stroke.

Select the Square Tool and draw another shape on the artboard, position this to overlap the original circle. Use the Align Palette to centre the two shapes horizontally.

From the same menu, use the Rounded Rectange Tool to draw a small leg. Adjust the roundness of the corners with the keyboard cursor keys until the ends are completely circular.
Zoom in and position the leg exactly in relation to the edge of the square body.

Duplicate the leg and move into position for the remaining limbs, for the arms rotate the shape by 45 degrees. To position the shapes behind the other objects, press the CTRL + [ and CTRL + ] keys repeatedly to adjust the stacking order of the selected objects.

Draw another perfect circle onto the artboard, and beside it a much larger oval. Overlap the two and use the Align Palette to position exactly.

With the two shapes selected, click the Subtract from Shape Area option from the Pathfinder palette. Click the Expand button to refresh the bounding box of the shape.
By using temporary shapes as tools along with the Pathfinder options, a range of custom objects can be created.

Position this semi-circular shape within the large circle of the character to represent the facial area. Draw in a small circle as an eye, fill this with a black swatch and clear any stroke. Copy and paste in front (CTRL + F), then move horizontally to the side (hold SHIFT to constrain the axis)
Grouping any pairs of objects, such as the eyes and arms will allow them to be centralised with the other objects using the Align Palette without being moved individually.

With the complete line-work character laid out and aligned, draw a selection around the complete object and copy and paste a duplicate. Move a copy off to the side as a backup.

With all the objects that make up the torso and limbs selected, chose the Add to Shape Area option from the Pathfinder tool and Expand to merge the shapes into one.

Fill the body elements with a very dark grey (95% black) and add a 4pt stroke aligned to the outside at 100% black.

In the Appearance Palette, click the small options arrow and select Add New Stroke.

This time, add a 4pt stroke aligned to the inside, with a lighter, 93% black. This multiple use of strokes is a technique I've come to use in my character designs which really helps lift the colours by adding a little depth and variation.

Select the facial area and fill with a pale skin tone, add a slightly thinner stroke at 3pt aligned to the outside using the 93% black.

Add a New Stroke through the Appearance Palette and give this line a slightly darker tone, aligned to the inside of the shape.

The basic version of the character is complete, ready for some stealthy ninja action.

Copy and paste multiple variations of the original line-work character. Adjust and rotate the limbs into a range of scary ninja combat positions, adjust the stacking order of the arms to in front or behind the body to give different effects.

With each individual character, repeat the process of merging shapes and colouring the objects to produce a group of cool ninjas. However, no ninja would be complete without combat accessories…

Create a staff using a long thin rectangle, fill the object with brown while adding a black outline.

Create a pointed object using the Star Tool, using the Direct Selection Tool select each of the points of the path from each arm of the star.

Upon selecting the Rotate Tool, the point of origin will automatically default to the centre of the object. Click and drag to adjust the overall shape of the star.

Draw a solid circle in the centre and fill the death star weapon with a metal like grey. Add a black outline and a secondary inner stroke with a slightly darker grey.

Using the same colour scheme, draw a triangle by dragging a shape with the Star Tool and pressing the downwards cursor key to reduce the number of points. Grab the upper most point with the Direct Selection Tool and drag vertically.

Select and drag the middle two points to squash the lower half into a sword like shape. Finalise this with a small brown rectangle, remember the majority of the handle would be concealed by the hand so only a small section is required.

Use the Pen Tool to neatly draw in a three sided shape to represent the chamfered finish of the sword blade.

Create two Nunchuk handles and the beginning and end points of the adjoining chain. With both chain elements selected head to Object > Blend > Make

Go back to Object > Blend > Blend Options, enter 5 under the Specified Steps option to alter the type of blend to give a line of individual items.

Use the Pen or Pencil tool to draw a temporary line to symbolise the desired route of the Nunchuk chain, with this and the blend selected, go to Object > Blend > Replace Spine.

Group each individual weapon and move into place on the various characters, completing the group making them ready for action!
Vector Ninja Characters
Using basic vector shapes, a stylish and fun image can be created using just the basic functions of Adobe Illustrator.

read more

Required: Illustrator CS

Introduction

I personally use Adobe Illustrator alot, to save my time and work more efficiently, I have created serveral custom Libraries Illustrator Templates. I have one template with only RGB Color Swatches, one with CMYK Color Swatches, and one with minimal Library items. The minimal Libraries template has removed all unused/unwanted Library items and is use to create my Illustrator tutorial source file. This way I can cut down on the file size because each Library item in your file costs memory. The templates store the Color & Gradient Swatches, Art Brushes, and Graphic Styles that I commonly use in my illustration. Imagine the time it will cost if I need to remove all unused Libraries every time I create a new tutorial file. Or I need to open up an existing file to copy the Color Swatches & Graphic Styles that I want.
Illustrator Template can store: Artboard setting, Color/Gradient Swatches, Graphic Styles, Symbols, Layers, graphic placeholders, and more. For full detailed information on Illustrator Template, please read Illustrator’s Help files.

1. Create Your Custom Libraries

Most of you probably already know how to create Libraries, so I’m not going to explain all the details. Creating your Libraries is very easy, just drag your object in the Library pallate or select the object and click on the New icon. To remove your Library items, select the items that you want to remove and click on the Trash Can icon.
custom libraries

2. Save Your Template

After you’ve done with the Libraries, go to File > Save as Template and name your template that is best describe the content/setting of the file, ie. RGB Color Setting, For Print.
save as template

3. New From Template

Now go to File > New From Template and Adobe Illustrator will create a new file with all the setting you’ve created in your template.
new from template

Conclusion

Start making Illustrator Template now and save your working time!

read more

Required: Illustrator 9+

1. Create the Circle Shapes

First create a circle path and fill it with orange color. Then Copy (Ctrl+C) it and Paste in Front (Ctrl+F). Scale down about 40% and drag it slight below the center point of the orange circle.
circle paths

2. Blend Tool

Select the Blend Tool, click on the top edge of the yellow circle and then click again on the top edge of the orange circle. Or you can blend them by selecting both circles, go to Object > Blend > Make (Ctrl+Alt+B).
blend tool

3. Add Final Light Reflection

Make an oval path and fill it with black & white Gradient and place it on top of the circles. Note if your color setting is CMYK, make sure the black for the gradient is full black(C=100, M=100, Y=100, K=100). With the oval path selected, go to Transparency pallate, select Screen Blend Mode. If your Transparency is not showing, go to Window > Transparency or press Ctrl+Shift+F10.
screen blend mode

Advantages

There are serveral advantages to create this glossy button with Illustrator than Photoshop:
  1. It is vector, which mean it is scalable.
  2. It is easier and faster to make this with Illustrator (less steps).
  3. Easier to change colors, just need to fill the circles with different colors.
final glassy buttons

read more

Required: Illustrator 8+

1. Create an Art Brush

Use the Pen Tool and create a path like the image on the left. Drag it to the Brushes Library pallate. If your Brushes is not showing, go to Window > Brushes or press F5.
create a path

New Art Brush

When the New Brush options window popup, select New Art Brush.
new art brush

Art Brush Options

Then the New Art Brush Options will pop out, leave everything as default, but select Tints for Colorization Method. Click Ok.
art brush options

2. Apply Your Strokes

Now you can apply this Art Brush to any stroke by clicking the Art Brush in the Brushes library.
art brush library

Bonus Tips

You can change your stroke color and weight to get various stroke effect.
final artwork

read more

Required: Illustrator 9+

1. Draw a Rectangle Path

Select the Rectangle Tool, create a box like the image below. Go to Effect > Distort & Transform > Zig Zag.
create a box

Zig Zag Options

When the Zig Zag window popups, check Preview to preview the result, enter Size=1, Ridges per segment=26, then click OK.
zig zag effect

2. Add Drop Shadow Effect

With the path selected, go to Effect > Stylize > Drop Shadow, and enter the following setting: Opacity=50, X Offset=1 Y Offset=2, Blur=3, and select black color.
add drop shadow

3. Place in Your Artwork

Now you can remove the stroke color and place in your artwork and align them center. That’s it!
final stamp image

Bonus Tips

If you are creating this stamp for print, make sure your Document Raster Effects Settings is 300dpi or you will get pixelated print out. To change your setting, go to Effect > Document Raster Effects Settings. If you are designing for web/screen, leave it as 72dpi because higher dpi takes more memory.
raster effects setting

read more

Required: Illustrator CS2+

1. Create the Graph

Select the Pie Graph Tool, click on the Artboard/screen, then enter 200×200px.
graph dimensions

Data Table

Your graph data table will pop-up like the image below. Enter 15, 55, 30 and then click on the check mark to apply changes. Close the data table.
enter data table

2. Ungroup the Graph

You need to ungroup or break the graph into parts in order to apply colors and effects to each individual piece. With the graph selected, go to Object > Ungroup or press Ctrl+Shift+G to break-up the graph into individual parts. There will be a warning box with this message: After a graph is ungrouped you will no longer be able to access its graph style, its data or change its graph designs. Click Yes. Now Ungroup again to break the object into pieces. Fill with any color you want and remove the stroke color.
ungroup graph

3. Apply Extrude & Bevel

Select any piece(I’ve selected yellow here), go to Effect > 3D > Extrude & Bevel.
drop shadow

3D Extrude & Bevel option

Expand the window by clicking on More Options. Now you may drag the cube on the left to specify the Rotation or enter the X-Y-Z Axis values manually. Enter 20pt for Extrude Depth. Add one more Light by clicking on the New Light icon and drag it as shown below.
3d extrude options

4. Make a Graphic Style

With the yellow piece selected, in the Graphic Styles pallate, click on the New Graphic Style icon. If your Graphic Styles pallate is not showing, go to Window > Graphic Styles or press Shift+F5.
new art brush setting

5. Apply Graphic Styles

Now select the orange and green piece, click on the Graphic Style you’ve created in the previous step to apply the styles to the orange and green piece.
apply graphic style

Final

To finish off, reposition the pieces of the pie. Notice after you have applied the Graphic Styles, the pie is off a bit, use the Selection Tool and put them back together. Now you have a nice colorful 3D pie graph.
final

Bonus Tips

You can use the same technique to create the bar graph like the image below. Click here to download the source file for this Bar Graph sample.
3d bar graph

read more